1. Blog Selection
Make good use of the cloud resources at hand, and try not to open additional paid cloud services. Use existing theme templates or frameworks, keep it as simple as possible, and easy to maintain and migrate.
2. Solution Selection
2.1 Summary
Solution 1 Github (public repo) + Hugo + Github Action
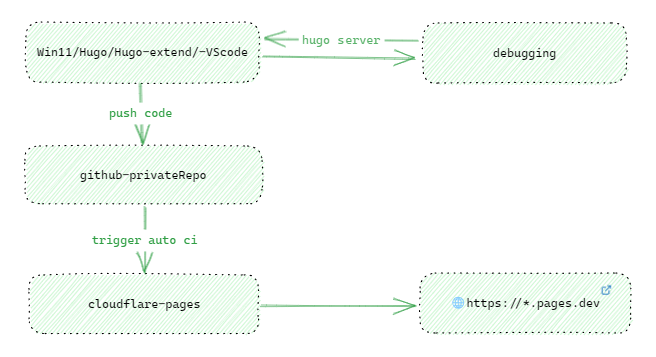
Solution 2 GitHub (private repo) + Cloudflare Pages (Hugo actions) + Cloudflare R2 (free image hosting)
Solution 3 Tailscale forwards homelab docker Halo/Typecho/Wordpress to public VPS
Solution 4 Deploy docker Wordpress directly on public VPS + Cloudflare CDN acceleration
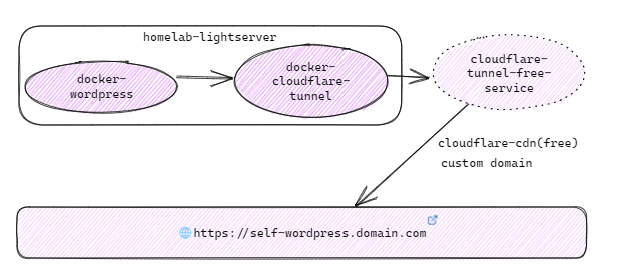
Solution 5 homelab docker Halo/Wordpress + Cloudflare tunnel + Cloudflare R2
2.2 Conclusion
After about a month of testing, I finally chose Solution 2.
2.3 Comparative Thoughts
Scheme 1 and Scheme 2
Scheme 2 is an upgraded version of Scheme 1. You don’t need to write an additional GitHub Action YAML file, nor do you need to make the blog repo public. Scheme 2 can also leverage Cloudflare CDN for route acceleration, so Scheme 1 really has no advantage. It is stripped down to only the basic value of Code Storage.
Scheme 3
Currently, the Markdown adaptation styles for dynamic blogs within this scope are not satisfactory. Compared to Typecho, which resumed open-source maintenance after a long hiatus, Halo is more complete. After deploying WordPress, there are many things to configure. The reasons for abandoning WordPress are twofold: one is that the article style for Markdown pages never achieves the desired simplicity, and the other is the page beautification issue, which requires debugging across different clients. If you pursue minimalist Markdown beautification effects without wanting to go through too much trouble, WordPress is not for you.
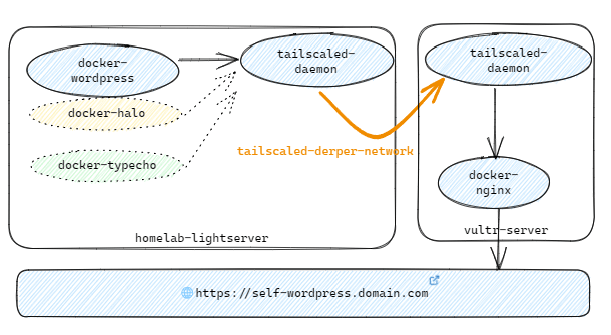
Scheme 4
The reason for this scheme is mainly that within Scheme 3, Tailscale forwards Docker Halo, Typecho, and WordPress, and using Nginx for redirection causes URL links to revert to the source IP incorrectly. Although Scheme 3 can keep resource usage within the internal network as much as possible to reduce public VPS overhead, multi-layer Nginx forwarding is solely for cost reduction. Given the time investment and the loading efficiency of public URLs, the problems are almost unavoidable, leaving only a mess. Thus, Scheme 4 was born: the VPS directly uses Cloudflare’s free CDN acceleration. Ultimately, the actual test demonstration of WordPress showed it was not suitable for me.
Scheme 5
Scheme 5 is an upgraded version of Schemes 3 and 4, controlling costs while eliminating the complex multi-layer Nginx forwarding configuration. Initially, I was quite pleased; functionality and URL loading efficiency were acceptable. However, the stability of Cloudflare Tunnel in China was unsatisfactory after actual testing. Tunnel is sufficient for a dev environment and is a great product abroad, but it is unstable in China. Specifically, Cloudflare Tunnel’s route proxy occasionally experiences interruptions, which I cannot accept. Although the blog site’s loading speed and cost control were optimal, occasional route interruptions occurred during daytime site maintenance. I considered a remedy using Tailscale Funnel to replace Cloudflare Tunnel, but actual tests showed Tailscale Funnel performed much worse than Cloudflare Tunnel, so Scheme 5 was directly abandoned. Ultimately, I returned to Scheme 2.
Focus on Solution 2
Originally planned to use obsidian-git for continuous publishing, but considering the isolation and convenience of notes and blog content, don’t add unnecessary complexity. Ultimately, I returned to the initial approach, using vscode with built-in typora for minimal continuous publishing. Because Hugo themes differ, the appearance of Markdown rendering is not what you see in your local md file. It is strongly recommended to preview and adjust formatting locally with hugo server before publishing. I installed Hugo and Hugo-extend on both a desktop Win11 and a laptop Win11, and tested Hugo. Whether for backup, restoration, or migration, it is very convenient. Additionally, Hugo themes are well-adapted to Markdown and look great; with Cloudflare CDN, URL loading speed is extremely fast. The solution is quite sustainable.
3. Image Hosting Selection
Initially, I planned to directly use GitHub’s image hosting for the blog and gradually find a replacement. However, GitHub’s image hosting is heavily blocked on many domestic ISP lines. I don’t want image loading failures in my blog. My ideal image hosting needs to meet several characteristics:
- Ensure loading speed, security, and stability
- Convenient storage
- Reasonable pricing policy
After researching Alibaba Cloud, Tencent Cloud’s paid OSS, as well as third-party Backblaze B2 and Cloudflare R2, I finally chose Cloudflare R2. I configured PicGo on Windows 11 to connect to Cloudflare R2, and used Dropbox locally as a backup directory for the image hosting. Basically, the various free quotas are sufficient for my use for a long time.
Note:
When configuring PicGo for Cloudflare R2 S3, pay attention to the image upload path. You can test and adjust to a path format you are satisfied with. I currently use:
{year}/{md5}.{extName}I wanted to use different directories in the bucket to distinguish image types, but I found that the PicGo S3 plugin currently does not support multi-path upload.
4. Deployment Testing
4.1 Resource Introduction
| - | Project | Description | Remarks |
|---|---|---|---|
| 1. | Alibaba Domain | Test .top domain (9 RMB for one year) | DNS resolution changed to Cloudflare |
| 2. | Cloudflare R2 | Use free quota within paid service | Requires credit card binding |
| 3. | GitHub | Create a private repo | Connect to Cloudflare R2 |
4.2 Solution Records
Some configuration records compiled during the operation, hoping to inspire your site building and save time on solution selection and trial-and-error costs.
4.2.1 WordPress
Test docker-compose.yaml wordpress demo
version: '3'
services:
  db:
    image: mysql:5.7
    container_name: db
    volumes:
      - ./db_data:/var/lib/mysql
    restart: always
    environment:
      MYSQL_ROOT_PASSWORD: "WordpDDDs**"
      MYSQL_DATABASE: wordpress
      MYSQL_USER: wordpress
      MYSQL_PASSWORD: wordpress1234

  wordpress:
    container_name: wp
    depends_on:
      - db
    image: wordpress:latest
    ports:
      - "8333:80"
    restart: always
    volumes:
      - ./wordpress:/var/www/html
    environment:
      WORDPRESS_DB_HOST: db:3306
      WORDPRESS_DB_USER: wordpress
      WORDPRESS_DB_PASSWORD: wordpress1234
      WORDPRESS_DB_NAME: wordpress
4.2.2 Halo
Test docker-compose.yaml halo demo
version: "3"
services:
  halo:
    image: halohub/halo:2.7
    container_name: halo
    restart: on-failure:3
    depends_on:
      - halodb
    volumes:
      - ./:/root/.halo2
    ports:
      - "8090:8090"
    healthcheck:
      test: ["CMD", "cURL", "-f", "http://localhost:8090/actuator/health/readiness"]
      interval: 30s
      timeout: 5s
      retries: 5
    command:
      - --spring.r2dbc.url=r2dbc:pool:postgresql://halodb/halo
      - --spring.r2dbc.username=halo
      # PostgreSQL password, ensure it matches the POSTGRES_PASSWORD variable below.
      - --spring.r2dbc.password='openpostgresql@2023'
      - --spring.sql.init.platform=postgresql
      # External access URL, modify as needed
      - --halo.external-url=http://localhost:8090/
      # Initial super admin username
      - --halo.security.initializer.superadminusername=admin
      # Initial super admin password
      - --halo.security.initializer.superadminpassword=P@88w0rd@20@#
  halodb:
    image: postgres:15.3
    container_name: halodb
    restart: on-failure:3
    volumes:
      - ./db:/var/lib/postgresql/data
    # ports:
    #   - "5432:5432"
    expose:
      - "5432"
    healthcheck:
      test: [ "CMD", "pg_isready" ]
      interval: 10s
      timeout: 5s
      retries: 5
    environment:
      - POSTGRES_PASSWORD='openpostgresql@2023'
      - POSTGRES_USER=halo
      - POSTGRES_DB=halo
      - PGUSER=halo
4.2.3 Typecho
Test docker-compose.yaml Typecho demo
version: '3.3'
services:
  typecho:
    image: joyqi/typecho:nightly-php8.0-apache
    container_name: typecho-server
    restart: always
    #privileged: true
    environment:
      - TYPECHO_SITE_URL=https://blog.xxx.top
      - TIMEZONE=Asia/Shanghai
      - MEMORY_LIMIT=200M
      - TYPECHO_INSTALL=1
      - TYPECHO_DB_ADAPTER=Pdo_Pgsql
      - TYPECHO_DB_HOST=postgres
      - TYPECHO_DB_PORT=5432
      - TYPECHO_DB_USER=typecho
      - TYPECHO_DB_PASSWORD="typecho@123T"
      - TYPECHO_DB_DATABASE="typecho"
      - TYPECHO_DB_PREFIX="typecho_"
      - TYPECHO_USER_NAME=auggie
      - TYPECHO_USER_PASSWORD="typecho@123T"
      - TYPECHO_USER_MAIL="[email protected]"
    ports:
      - 8083:80
    depends_on:
      - postgres
    volumes:
      - /var/typecho:/app/usr

  postgres:
    container_name: postgres
    image: "postgres:13"
    environment:
      POSTGRES_PASSWORD: initialpassword
      TZ: Asia/Shanghai
    volumes:
      - ./postgres:/data/postgres
      - ./init.sql:/docker-entrypoint-initdb.d/init.sql
    expose:
      - "5432"
    restart: unless-stopped
init.sql referenced by typecho postgres initialization
ALTER USER postgres WITH ENCRYPTED PASSWORD'typecho@123T';
CREATE DATABASE typecho;
CREATE USER typecho WITH ENCRYPTED PASSWORD'typecho@123T';
GRANT ALL PRIVILEGES ON DATABASE typecho TO typecho;
4.2.3 Cloudflare tunnel
Test docker-compose Cloudflare tunnel
version: '3'
services:
  cloudflare-tunnel:
    image: cloudflare/cloudflared:latest
    container_name: cftun
    hostname: cloudflare-tunnel
    restart: unless-stopped
    network_mode: "host"
    command: "tunnel --protocol http2 run"
    volumes:
      - /etc/localtime:/etc/localtime:ro
    environment:
      - "TUNNEL_TOKEN=eyJ*****STNPV1l0WWpSallXSXlOVFpoT1dKbCJ9"
    #labels:
      #- "com.centurylinklabs.watchtower.enable=true"
4.2.4 Hugo
Win11 local installation of hugo/hugo-extend, GitHub private repo creation process, all omitted. According to Cloudflare official documentation, it can be easily done. The theme used is rhazdon/hugo-theme-hello-friend-ng. Compared to bloated server-side blogs like WordPress, static Hugo is much easier to maintain and migrate. You only need to focus on Markdown content output, and leave everything else to the cloud without worrying about security issues.
5. Postscript
Cloudflare Dashboard - Websites - Add Site - Add the target domain name whose DNS you want to change. Cloudflare will automatically assign two DNS IPs to you, which are different for each person. After modifying the operation, you can use Cloudflare’s domain registration-related CDN services only after Alibaba Cloud’s review is passed.
Changing Alibaba Cloud domain DNS resolution to Cloudflare may affect existing resolution services under the domain you are modifying. Try to use a bare Alibaba Cloud domain or take a screenshot of the current domain resolution status in advance. When running docker cloudflare tunnel for homelab internal services, be sure to add and use the --net=host network mode, otherwise the container cannot use the host’s network forwarding. The official documentation is flawed in this part, please note.
In the end, the DDNS service set up at home was not used. The host’s docker cloudflare tunnel service will forward the internal docker service mapping to the custom domain name in the Cloudflare tunnel web console, achieving public access to the bare domain name. The tunnel custom domain name needs to be configured and added in the Cloudflare web console. There is a free quota limit, but it is sufficient for personal use.
6. References
Alibaba Cloud Domain Using Cloudflare for CDN Acceleration
How to Transfer Alibaba Cloud Domain to Cloudflare - Detailed Guide with Images
Account limits · Cloudflare Zero Trust docs
Comments